Whew! Its finally done...It took me long well quiet long because I wanted to model it quiet detailed BUT its done!! This probably will be the last time I model a car unless there is someone paying me to do so or am getting something out of it. It just that I am pretty cocky and I did it mainly because I can do it!! Animation of this hmmmm its pretty heavy in the scene, I used up all 24 material slots and required some more as well. I learnt a lot from this work.. One thing I got stuck on was the Lights ( u know how car lights are, there are some pattern/texture on it and once u don't model it right off the bet, its pretty hard to define that just with materials and textures, and guess what, I DID NOT MODEL IT just used a base cylinder to make the lights so it took me maybe 5 hrs to fake the lights but i did it and learnt alot about materials during the process ( always something good comes out of it ). Then comes the light set-up and scene setup..wow it took a lot of experimentation to get a good result. Below you can see my scene set up.
 Click on picture for better resolution
The scene is already pretty heavy with my model itself, since i made the engine, the logos,the brake disc and brakes and also the interior, below is the wireframe picture of the model and imagine thats after I isolate the turbosmooth, there were more than 10000+ vertices before I apply the turbosmooth so multiply that by 2-5 thats how much heavy my scene became without the studio setup. Here are a couple of the wireframe stills
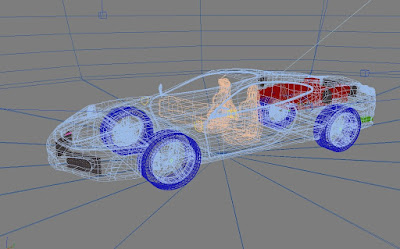
 Click on picture for better resolution
Now comes the rendering part, I set up 5 cameras and replaced it again with 8 more because I wanted to capture the closeups. I tried rendering in HDTV which is 1920×1080p but I didn't have the patience. So I switched to 1000x800 and one scene took maybe like 5 minutes to 10 minutes to render ( I used Vray, Irradience set to Low, 20x20) I cant imagine how long it will take if it was set to high. Anyways enough about the procedure..here are the results: Pay close attention to the lights, Im proud that I faked it quiet nice :)
Click on picture for better resolution (1000x800)Click Here if its a little blurry for clearer version.
 Click Here
 if its a little blurry for clearer version.
 Click Here
 if its a little blurry for clearer version.
 Click Here
 if its a little blurry for clearer version.
 Click Here
 if its a little blurry for clearer version.
 Click Here
 if its a little blurry for clearer version.
 Click Here
 if its a little blurry for clearer version.
 Click Here
 if its a little blurry for clearer version.
 Click Here
 if its a little blurry for clearer version.

There you go. On a final note this goes out to my hardest critic my 3Dloverlover ( all those patience huh) and also to Vray ( I love you Vray hahaha, since I met you my life has changed in all 3dimensions :P )
Lastly, this is a 3D car and not a real one...if it doesn't look real to anyone of you well its not real once again haha but well there is a way to make it look real and that is to set it up in a real-life enviroment ( I might do that one day if I get the patience and the urge ) otherwise the only solution is GO GET ONE!! ;)
Enjoy!!


